

Unlock the full potential of your smart home with our guide, Learn how to choose smartly, future-proof your setup, and optimize Home Assistant efficiently from the inception of your system.
Why Optimize Home Assistant From The Get-Go?
- Enhanced Efficiency: Streamlining saves time and reduces headaches later on.
- Improved Performance: A well-planned setup runs smoother and is more reliable.
- Ease of Management: An organized system simplifies changes and upgrades.
Let’s cut to the chase. No mucking about here, but these three benefits will be unbelievably crucial in terms of optimizing your smart home setup
Top 3 Optimization Tips
1. Selective Device Integration
Before you dive into setting up Home Assistant, taking a strategic approach to selecting your devices is crucial. Compatibility and communication between devices can make or break your smart home experience.
Understand Your Needs
Before pulling the trigger on those items in your basket consider what you want to achieve with your smart home. Are you looking to increase security, enhance comfort, critical notifications, save on energy, or maybe a system that encompasses all of the above? Having a general understanding of what you’d like to accomplish with your home automation system will greatly reduce the chances of building a system that doesn’t align with your goals.
Make a plan! I say this, but if your first setup is anything like mine, you’ll encounter a lot of trial and error. To mitigate any teething issues from the onset, its best to flesh out as much of the initial concept to get ahead of any teething issues. You will want to keep in mind roughly how many devices you’ll be integrating into your smart home? What protocol will they be using to communicate and what are its pros and cons? Will the hardware that you choose be able to fulfill the tasks of the entire smart home, or will the coordination be split amongst more than one machine?
Compatibility
Thanks to the devs at Nabu Casa and the unsung heroes of the open source community, Home Assistant supports a wide range of devices, but not all of these will work right out of the box or integrate seamlessly without additional configuration.
You can check the compatibility of the products that you’re planning to use by checking the Home Atssistant integrations documentation page for official integrations or Home Assistant Community Store (HACS) for community integrations that might not be officially supported. Between these two resources, you can scour the list of devices that are currently supported within Home Assistant, and further reading on the Home Assistant Community Forum will provide a bit of insight in terms of ongoing issues with devices, troubleshooting, and how other community members are making use of their setup.
Optimize via Protocol Selection
Furthermore, choosing devices that share the same communication protocol can greatly simplify your setup and strengthen device interaction. You might be split between Z-wave, Zigbee, Wi-Fi, bluetooth, thread, and you might land on integrating a variety of these protocols or just integrating one (for simplicities sake).

Each of these might be hit-or-miss for you depending on:
- Device Polling Frequency: How often your devices need to communicate with the server can influence your choice of protocol. For instance, protocols like Zigbee and Z-Wave are generally more power-efficient and better suited for devices that don’t require constant communication, such as sensors and smart locks.
- Network Bandwidth: Wi-Fi devices typically require more bandwidth. If your network is already heavily loaded with other types of traffic, adding many Wi-Fi smart devices might not be the best option. In contrast, Z-Wave and Zigbee operate on different frequencies and can handle more devices without taxing your Wi-Fi network.
- Range Requirements: The physical layout of your home affects the range requirements of your smart devices. Zigbee and Z-Wave have good range and can extend further through the use of mesh networking, where each device can act as a repeater. Wi-Fi and Bluetooth, however, may have limitations if the router or central hub cannot effectively cover your entire home.
- Interference: Zigbee: Operates in the crowded 2.4 GHz frequency band, which is also used by Wi-Fi, Bluetooth, and other devices, potentially leading to interference. Wi-Fi: Also operates mainly at 2.4 GHz and 5 GHz. While the 5 GHz band is typically less congested, it doesn’t penetrate walls as effectively as the 2.4 GHz frequency.
This isn’t an exhuastive list, but these are some major factors to consider when trying to decide on a protocol. Maybe I’ll dedicate a full write-up to specifically this when the motivation strikes!
Brand Ecosystem Benefits
Sticking to one brand or a compatible ecosystem enhances the overall stability and usability of your Home Assistant setup. It also makes troubleshooting simpler, as you’re dealing with a more uniform set of technologies and support resources.
Imagine this scenario:
If you have a Tapo light bulb and a Phillips Hue light bulb experiencing delays in on/off command responses, troubleshooting becomes more complex than if both bulbs were from Phillips Hue. In a mixed ecosystem, diagnosing issues involves different technologies and support systems, requiring brand-specific steps and tools. Conversely, a uniform Phillips Hue setup simplifies troubleshooting, as the same methods and tools apply to all devices, streamlining the process and speeding up resolution.
2. Future-Proof Your Setup
Selecting the right hardware to optimize your Home Assistant setup involves more than just meeting the minimum requirements for running the software. Here are some tips on choosing hardware that not only satisfies current needs but also anticipates future advancements:
- Over-Spec Rather Than Match-Spec: Aim for hardware that offers significantly more power than you currently need. This might mean choosing a server with a faster processor, more RAM, and greater storage than your immediate requirements dictate. For instance, if Home Assistant running on a Raspberry Pi fits your use-case for a home automation system, consider a mini PC or a dedicated server with an advanced CPU and expanded RAM to handle additional devices and more complex/responsive automations in the future.
- Consider Modularity: Hardware that allows for upgrades like additional RAM, Bluetooth dongles (if not already built-in), storage expansion, or even GPU installation can be beneficial as your needs grow. A modular approach lets you adapt and upgrade your system incrementally, which can be more cost-effective over time and helps optimize your Home Assistant setup to meet future demands.
- Look for Energy Efficiency: Since your Home Assistant server will likely be running 24/7, opting for energy-efficient hardware not only reduces operational costs but also minimizes heat generation, which can be crucial for maintaining the longevity of your components.
Sustainability and Scalability
Ensuring your smart home setup is sustainable and scalable involves planning not just for the physical hardware but also for integrating new technologies and capabilities as they become available:
- Adopt an Expandable Ecosystem: When adding smart devices, consider how easily new categories of devices can be integrated in the future. For example, if your home is already fitted with a bespoke smart lighting/security, you will need to verify whether adding a smart heating system or voice assistants later won’t require a complete overhaul of your existing setup.
- Plan for Software Updates and Security: Choose devices and platforms known for regular updates and strong security protocols. Regular firmware and software updates not only add new features but also patch vulnerabilities, which is crucial for the longevity and security of your smart home.
- Flexible Software Architecture: Home Assistant is my go-to Home Automation recommendation due to highly customizable and frequently architecture. Utilize its open-source nature by planning for custom integrations, plugins, and potential changes in the backend that might be required as new standards and technologies emerge in the IoT space.
Backup and Recovery
- Regular Backups: Ensure that your setup includes a robust backup system. Automated backups to a cloud service or a physical external drive can save a lot of trouble in case of hardware failure or data corruption. Ideally (granted you have the resources) you would follow the 3-2-1 backup strategy wherein you have a local backup, a physical backup off-site that you have access to, and a backups in the cloud.
- Recovery Plan: Have a clear plan for quickly restoring your system to its last good state in case of failure. This ensures minimal disruption to your smart home functionality. Its always good practice to TEST YOUR BACKUPS. Worst-case scenario is trying to recover from one of your backups only to discover that
- Your backups actually haven’t been saving to your storage location
OR - Your backups are corrupted, all hope is lost, and the child isn’t yours
- Your backups actually haven’t been saving to your storage location
By taking these steps to future-proof your Home Assistant setup, you prepare your smart home to adapt flexibly to both current and emerging technologies, ensuring that your setup remains robust and capable over time. This strategic foresight not only enhances your smart home experience but also maximizes the utility and longevity of your system.
3. Organize From the Start
Labeling and categorization of entities, automations, and scripts at the onset of your automation journey can significantly enhance the manageability of a setup. Here are some key benefits to this approach:
- Enhanced Searchability and Accessibility: When you have clearly labeled and well-categorized components in your Home Assistant dashboard, finding and modifying entities is a breeze. This is particularly helpful in larger setups where numerous devices and routines can create complexity.
- Streamlined Troubleshooting: When issues arise, a well-organized system allows you to quickly isolate problems and identify malfunctioning components without sifting through ambiguously named entities. If an automation fails, knowing exactly where to look based on clear labels and logical categorizations speeds up the troubleshooting process significantly.
- Efficient Management of Automations and Scripts: Grouping related automations and scripts under common categories not only tidies up your interface but also helps in understanding the flow and interaction between various automations. For instance, categorizing all lighting-related automations together allows for easier modifications and expansions of lighting scenes and settings.
- Reducing Organizational Cleanup: Labeling and categorizing your setup from its onset will greatly minimize the need for extensive restructuring later, saving time, effort and days of bashing your head against the wall trying to remember the naming convention that you’ve gifted to your automations and scripts
Here’s an example of how I’ve structured just a few of my labels and categories:
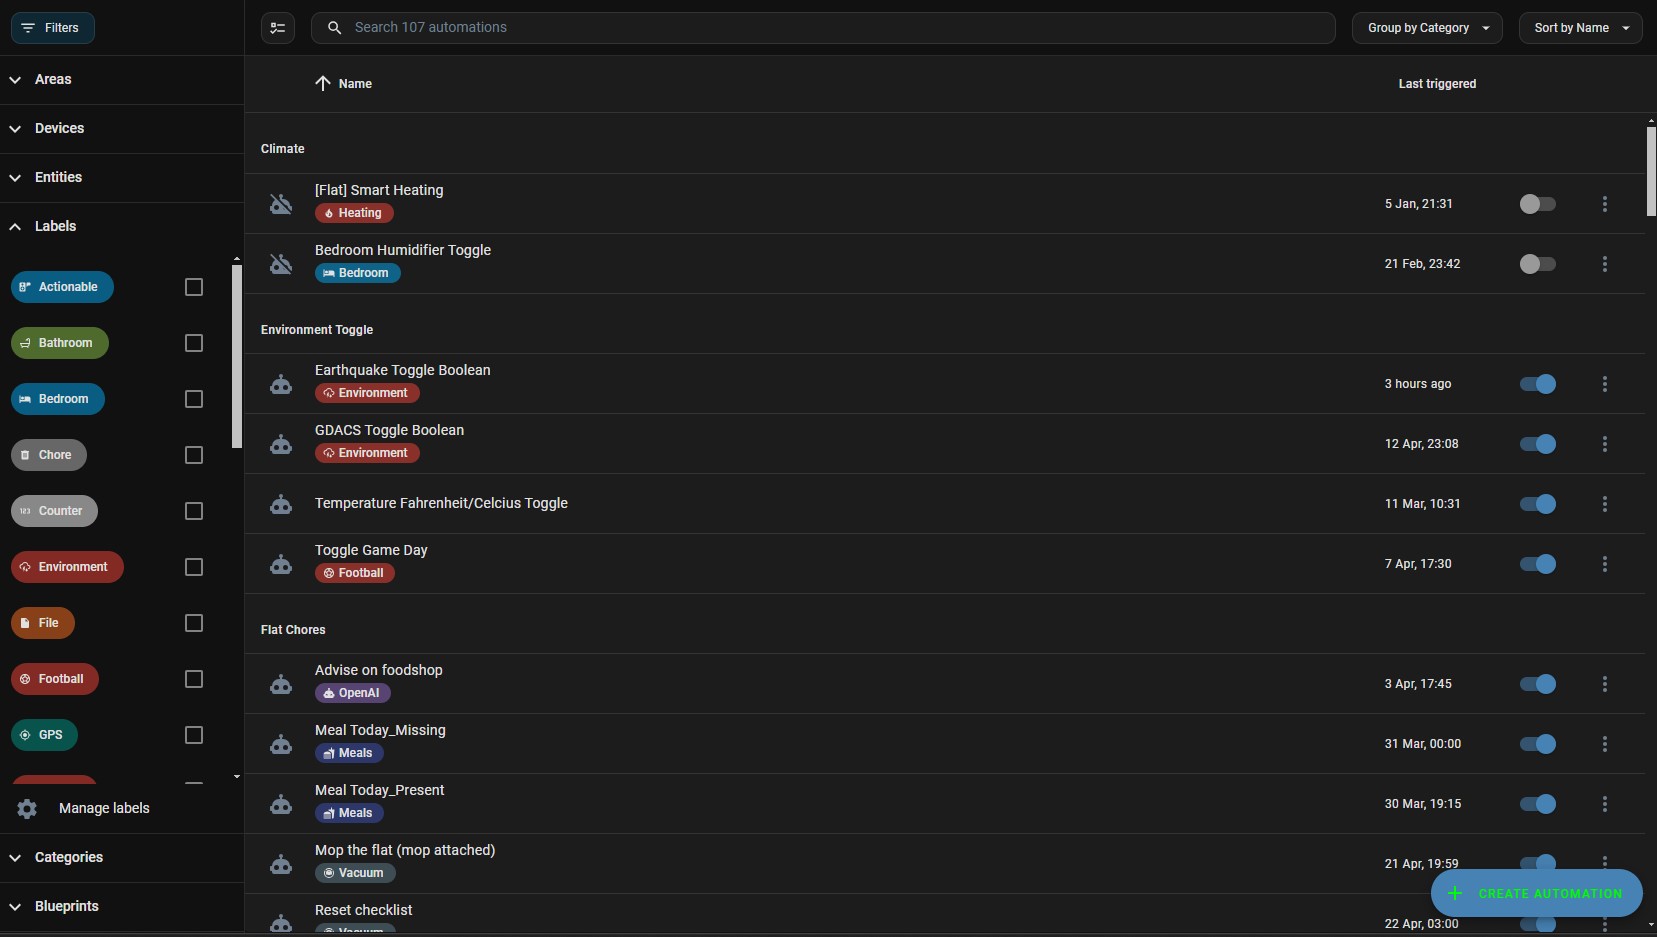
You won’t necessarily need all of these labels and categories, but structuring them as shown above will allow you to group, retrieve, and control your entities/automations/scripts intuitively
Key Takeaways
Implementing these tips from the outset can greatly enhance your Home Assistant setup’s functionality and user experience, making your smart home more adaptable and easier to manage. I hope these tips on optimizing your Home Assissant setup has brought clarity to your very being and hope to your cold cold heart.